
As a programmer it helps to be comfortable across many different platforms, and learn to leverage the benefits of each. After purchasing my first Mac – an old MacBook – I set out to create a tailored environment that would help my Ruby (and other) development sing.

- Summary
- Checking existing environment
- Installation Steps
- Install optional stuff
- Other stuff worth checking out
- Troubleshooting
- Tips for installing on Mac OS X 10.8 and above
- Installing Xcode CLT via command-line
- Conclusion
Summary

There are lots of options for setting up a development environment on a Mac, and even more options for the Ruby side of things. Starting with a clean install of Mac OS X 10.7 (Lion), in this case, I worked out the best combination of development tools to suit my needs. While these lean towards Ruby, they should be a good baseline for other development needs.
UPDATE - 24 January 2014: I have since tested these instructions on Mac OS X 10.8.5 (Mountain Lion) and made some minor edits to ensure that both OS X 10.7 and OS X 10.8 are covered. Particular revisions for OS X 10.8 are covered in: Tips for installing on Mac OS X 10.8 and above.
Here’s a summary of the choices I made:
- Mac OS X 10.7.5. I had 10.7, and it’s necessary to “Software Update” this to the latest version. Other guides1 may assist with filling in the gaps for more-recent versions of OS X.
- Xcode Command Line Tools (Xcode CLT). At about 140MB, this gives us various essential build tools without needing the full Xcode package;
- Homebrew. Mac package management has never been easier, or more reliable!
- RVM. This is my preferred2 Ruby version manager. It makes installing/updating Ruby easier, and gives you more options.
- Ruby 1.9.3. It’s a well-established standard. I will make the switch to Ruby 2.x when it’s more mature and dominant.
- Bundler. Managing gems is delightfully simple and transparent with this.
- iTerm2. I haven’t yet found a Terminal program on any OS that I like more than iTerm2.
- Sublime Text. Available for Mac, Windows, and Linux; it supports most of the stuff you can plug into TextMate, with many other cool features.
- Git and GitHub. They’re just done so well, and really you can’t do without them.
Things NOT covered by this article:
- Targeting specific platforms. I’m not yet worrying about building stuff specifically for OS X, iOS, Android, or otherwise. I’m sure there are plenty of excellent guides on the web if you’re looking to get heavily into conventional app development or otherwise use the full suite of tools provided by Xcode.
- Database engine. I’d probably go for SQLite3 for basic stuff and private apps, and PostgreSQL for web apps or apps dealing with big data. I’m not much interested in MySQL anymore.
-
Shell. Though I’ve used Z-Shell (
zsh) before and I like it, I will stick with the defaultbashfor now. - Ruby on Rails.
NOTE: Developing on a Mac may not necessarily be the right choice for you. Be aware of some of the arguments for using other platforms before jumping head-long into purchasing a Mac or otherwise abandoning an existing platform that is working for you.
Checking existing environment
This is just a background check, for your reference. It might not really be that important, unless you already use your Mac for other development stuff and need to maintain an environment. You can skip to the next section if you prefer.

I started with a fresh (not-yet-updated) install of Mac OS X 10.7 (Lion) on an old
Mid-2007 black MacBook (MacBook2,1, model A1181) with 2GB of RAM and an
Intel Core 2 Duo CPU (x86 only3). I’ve found the performance of Lion and my dev
tools, on this Mac, to be adequate.
This is how I inspected my existing environment, in Terminal:
-
Find out Mac OS X details:
$ system_profiler SPSoftwareDataType Software: System Software Overview: System Version: Mac OS X 10.7 (11A511) Kernel Version: Darwin 11.0.0 Boot Volume: Anton250GB Boot Mode: Normal Computer Name: OldMacBook User Name: Anton Maurovic (amaurovic) Secure Virtual Memory: Enabled 64-bit Kernel and Extensions: No Time since boot: 1 day11:50 -
Check the versions of Ruby and Rubygems that come bundled with 10.7:
$ ruby --version ruby 1.8.7 (2010-01-10 patchlevel 249) [universal-darwin11.0] $ gem --version 1.3.6 -
Verify that there is not (yet) any C compiler, or
make:$ gcc --version -bash: gcc: command not found $ cc --version -bash: cc: command not found $ make --version -bash: make: command not found
Installation Steps
NOTE: I only show use of sudo (i.e. root operations) where strictly required.
Many commands are best run just as your regular, un-elevated user. Your user should
still be in the class of “Administrators”, however, for when you get to steps that
do require sudo.
These instructions are intended for OS X 10.7 and above. Earlier versions of OS X probably require that you download and install the full Xcode package from Apple, suitable for your specific version of OS X.
Pre-requisites
-
Use your Mac’s “Software Update” to ensure4 you have the latest version of your OS X.
-
Check
system_profiler SPSoftwareDataTypeagain:$ system_profiler SPSoftwareDataType Software: System Software Overview: System Version: Mac OS X 10.7.5 (11G63) Kernel Version: Darwin 11.4.2 Boot Volume: Anton250GB Boot Mode: Normal Computer Name: OldMacBook User Name: Anton (amaurovic) Secure Virtual Memory: Enabled 64-bit Kernel and Extensions: No Time since boot: 2:48 -
Check Ruby version:
$ ruby --version
ruby 1.8.7 (2012-02-08 patchlevel 358) [universal-darwin11.0]
Installing “Xcode Command Line Tools”
People have suggested osx-gcc-installer instead, but since SOME stuff can’t be compiled with it, even its maintainer (Kenneth Reitz) seems to advocate using Xcode Command Line Tools.
Xcode CLT is needed for Homebrew. So that we don’t have to install the full Xcode (over 1.6GB!) we’ll install “Xcode Command Line Tools” (between 100MB and 140MB):
-
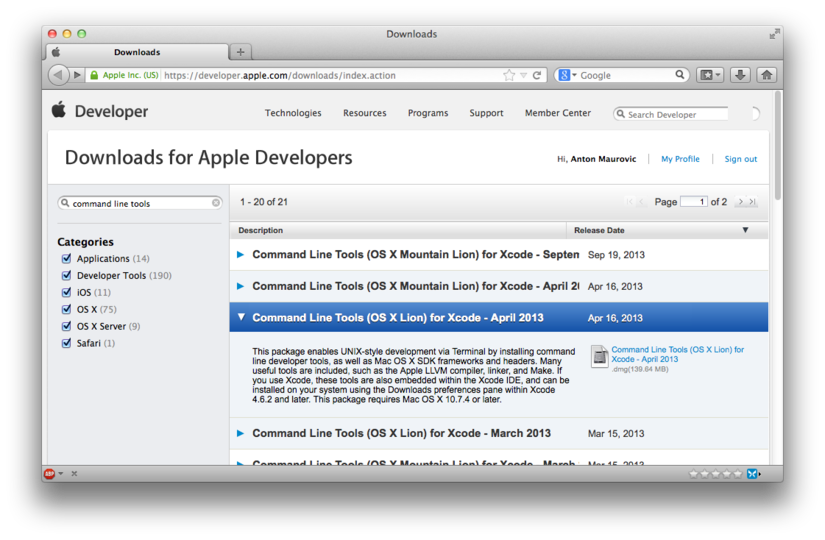
You will need an Apple Developer account (which you can register for free).
-
Once you hit the main download page, you may need to search for “
command line tools” to find the right one for your OS X version: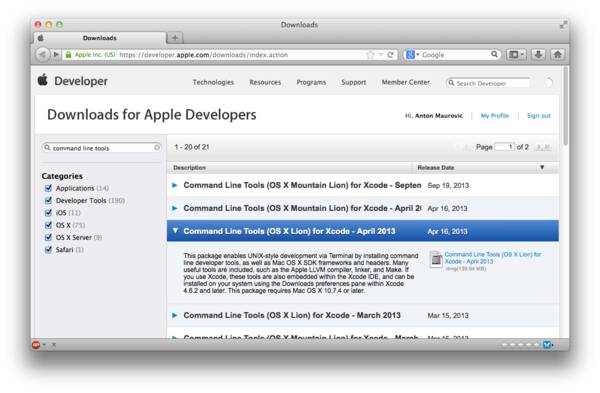
-
IF you have to do everything via command-line, for some reason, see the instructions for installing Xcode CLT via command-line. Otherwise, just do the following…
-
Double-click the DMG file you downloaded, to mount it.
-
From the Finder window that pops up, double-click
Command Line Tools (...).mpkgor whatever your package is called. -
Step through all defaults, to install.
-
Unmount the DMG.
Now we should have gcc, make, and a few other important things. For example:
$ gcc --version
i686-apple-darwin11-llvm-gcc-4.2 (GCC) 4.2.1 (Based on Apple Inc. build 5658) (LLVM build 2336.11.00)
...

$ make --version
GNU Make 3.81
...

$ git --version
git version 1.7.12.4 (Apple Git-37)
Installing Homebrew

Homebrew is described as “the missing package manager for OS X”. It is basically like the Debian/Ubuntu APT system, and makes it quite fast and easy to find software packages, install them, update them, and remove them. There is an alternative – MacPorts – but I strongly prefer Homebrew for its simplicity and reliability.
-
Go into Terminal and run:
ruby -e "$(curl -fsSL https://raw.github.com/Homebrew/homebrew/go/install)" -
Check with:
brew doctor -
In my case it has nothing to recommend:
Your system is ready to brew. Otherwise, you may need to tweak some things to make it happy, but it should tell you what to do. -
Run:
brew update
Installing Git, and configuring for GitHub
Now that we have Homebrew, installing packages is so much easier. We’ll start by installing Git, then configure it to enhance your shell prompt, test it out, and optionally link it up to your GitHub account, if you have one.
-
Run:
brew install git -
Now, at this point I ran
git --versionand found it was still executing the old (Apple Git-37) version instead of the new one I just installed. I exited my Terminal and started up a new one, to load the latest config, and ranbrew doctoragain, which told me:$ brew doctor Warning: /usr/bin occurs before /usr/local/bin This means that system-provided programs will be used instead of those provided by Homebrew. The following tools exist at both paths: git git-cvsserver git-receive-pack git-shell git-upload-archive git-upload-pack Consider setting your PATH so that /usr/local/bin occurs before /usr/bin. Here is a one-liner: echo export PATH="/usr/local/bin:$PATH" >> ~/.bash_profile…but there’s an error, in this one-liner at the end. Here is the exact, revised statement that I executed:
echo export PATH="/usr/local/bin:\$PATH" >> ~/.bash_profileThe difference is the extra backslash at
\$PATH. -
After executing that statement to update my
~/.bash_profile, I exited my Terminal, and then went into it again to ensure all settings were refreshed. -
Now
git --versiongives:$ git --version git version 1.8.4 -
Configure Git, using your preferred personal details:
git config --global color.ui true
git config --global user.name "Yourfull Namehere"
git config --global user.email "ifyoureally@wantto.com"

git config --global push.default simple   # !! SEE BELOW !!
Note that the last option for
push.defaultshould only be set for Git 1.8.x or above. It tells Git that when we do agit push, we only want to push commits for the branch that we’re currently on rather than all branches. You don’t have to do this, if you don’t want. -
You can now enhance your prompt, so that it will reveal information about your Git branch, any time you’re in a directory inside a Git repository. These instructions are adapted from this article, but have been re-written slightly to make it clearer what, exactly, you need to do:
-
First, download the
.git-prompt.shscript to your home directory:curl -Lo ~/.git-prompt.sh https://raw.github.com/git/git/master/contrib/completion/git-prompt.sh -
Add the following lines to the end of your
~/.bash_profilescript (creating the file if it doesn’t already exist):source ~/.git-prompt.sh NONE="\[\033[0m\]" RED="\[\033[0;31m\]" GREEN="\[\033[0;32m\]" YELLOW="\[\033[0;33m\]" BLUE="\[\033[0;34m\]" MAGENTA="\[\033[0;35m\]" WHITE="\[\033[1;37m\]" PS1="$GREEN\t$RED-$BLUE\u:$YELLOW\W$MAGENTA\$(__git_ps1)$WHITE\$$NONE " # OR, if you don't want to use a colour prompt: #PS1="\t-\u:\W\$(__git_ps1)\$ " -
Reload your shell’s environment to see the new prompt:
source ~/.bash_profile
-
-
Create
~/projects:mkdir -p ~/projects -
Test git, and your updated prompt:
$ cd ~/projects

$ git clone https://github.com/mechanicles/ruby-tictactoe.git
Cloning into 'ruby-tictactoe'...
remote: Counting objects: 6, done.
remote: Compressing objects: 100% (6/6), done.
remote: Total 6 (delta 0), reused 6 (delta 0)
Receiving objects: 100% (6/6), done.

$ cd ruby-tictactoe
21:57:52-amaurovic:ruby-tictactoe (master)$
NOTE appearance of the
(master)branch identifier. -
The following GitHub steps are optional, if you’re going to use GitHub…
-
Generate an SSH key, noting that a passphrase is optional.
-
Configure your git…
git config --global github.user "your_github_username" -
Restart your shell; i.e. exit Terminal and then bring it up again.
Installing RVM
RVM – Ruby Version Manager – lets you easily install Ruby, and optionally multiple different versions of Ruby on the same machine, such as 1.9.3; 2.0.0; the retired 1.8.7; and even JRuby and Ruby Enterprise Edition. It can manage multiple Gemsets for each, and allow each project to specify particular Ruby and Gemset requirements at runtime.
-
Install RVM:
\curl -L https://get.rvm.io | bash -s stableNOTE: The leading backslash is deliberate5.
-
Add the following as the last line of your
~/.bash_profilefile:[[ -s "$HOME/.rvm/scripts/rvm" ]] && . "$HOME/.rvm/scripts/rvm"This ensures RVM will be loaded when you log in, and will hence activate when required.
-
Restart your shell (i.e. exit Terminal and then go back into it).
-
Check:
$ type rvm | head -1 rvm is a function $ ruby --version ruby 1.8.7 (2012-02-08 patchlevel 358) [universal-darwin11.0] -
Install Ruby 1.9.3:
rvm install 1.9.3
rvm --default 1.9.3
Be aware: When testing these instructions on Mac OS X 10.8.5, I found that
rvm install 1.9.3failed about 22 minutes in, and an extra step was required. See below re tips for installing on Mac OS X 10.8 and above.NOTE: This isn’t necessarily going to happen quickly, as it may have to do a lot of work in downloading prerequisites, and then compiling. For me, on my slow old MacBook, this took about 1 hour. On a 2013-model iMac with OS X 10.8.5, it took about 30 minutes.
-
Now run:
$ ruby --version
ruby 1.9.3p448 (2013-06-27 revision 41675) [x86_64-darwin11.4.2]

$ rvm list

rvm rubies

=* ruby-1.9.3-p448 [ x86_64 ]

# => - current
# =* - current && default
#  * - default
Install Bundler

Bundler is a very popular, and widely-supported way to manage a set of Gems per each
of your Ruby projects. By use of a Gemfile (which is a very simple Ruby script that dynamically defines
dependencies for specific Gems and respective versions), you can ensure the correct
environment is managed in the scope of your application for development, production,
and other purposes. And it’s just so easy!
-
As per the instructions:
gem install bundler -
Create the file
~/.gemrc:--- :benchmark: false gem: --no-ri --no-rdoc :update_sources: true :bulk_threshold: 1000 :verbose: true :sources: - http://rubygems.org :backtrace: false…this sets various global parameters for the
gemcommand, in particular ensures the--no-ri --no-rdocparameters are always used when installing gems. This is intended to speed things up, and makes the assumption that you will always use a documentation source other than the gem files themselves – e.g. online, such as from the excellent APIdock website.
Install optional stuff
The following packages are optional, but highly-recommended as they add a lot of value. You can also customise them as you need.
Install ImageMagick
If you intend to programmatically process images, say via a script or Ruby
app, you will most likely find yourself using ImageMagick. In my case, I use
it both via command-line (i.e. convert command) and via a Gem
(with RMagick for Ruby).
I expected to get a stable ImageMagick install with a single Homebrew
command: brew install imagemagick. However, after doing this, SVG files I wanted
to process were randomly problematic. I found that the solution was to install ImageMagick
specifically with librsvg integration. I did that as follows:
-
If ImageMagick has already been installed with Homebrew, remove it first:
brew uninstall imagemagick -
librsvgneeds to be installed before you can build ImageMagick against it. Note that this took over half an hour for me:brew install librsvgIf you’re running Mac OS X 10.8 or above, this may give an error that X11 is absent, with a recommendation to install XQuartz. For more info, see below re tips for installing on Mac OS X 10.8 and above.
-
Then, install
imagemagickspecifically using the--with-librsvgoption:brew install imagemagick --with-librsvg
Install git-flow

git-flow is an extension to the git command that helps you manage formal development-grade
and production-grade streams in any given repository. Sometimes this may be overkill for a
small, internal, or otherwise private project, but it may still turn out to be more useful
than you expect.
To understand git-flow better, I suggest you read the original description of the git-flow model, but bear in mind that it was written before the git-flow helper commands were created. That document just explains basically how it works.
Whether you read that or not, there is a great git-flow cheatsheet which shows clearly what the git-flow helper commands are, and how to use them.
So, to actually install git-flow, simply do this:
brew install git-flow
…and then verify it with:
$ git flow help
usage: git flow <subcommand>

Available subcommands are:
   init      Initialize a new git repo with support for the branching model.
   feature   Manage your feature branches.
   release   Manage your release branches.
   hotfix    Manage your hotfix branches.
   support   Manage your support branches.
   version   Shows version information.

Try 'git flow <subcommand> help' for details.
Fix vim config

I use vim for quickly editing files from time to time at the command-line,
including over SSH. If you don’t use it, you can skip this section.
-
Grab a template that fixes cursor keys:
VIMRC_EXAMPLE="`ls -d1 /usr/share/vim/vim*/vimrc_example.vim | head -1`" cp "$VIMRC_EXAMPLE" ~/.vimrc -
Add the following to
~/.vimrcfor other enhancements:" Add these if needed: " filetype plugin indent on " syntax on " Two-space soft tabs, always: set tabstop=2 set softtabstop=2 set shiftwidth=2 set expandtab " Line numbers: set number " Disable backup files: set nobackup " Configure F6 to toggle 'paste mode' set pastetoggle=<F6>
The config file above does the following:
-
Uses a template that defines proper Vim handling of your Mac’s Home/End and other such navigation keys.
-
Globally uses ‘soft tabs’ (i.e. runs of space characters instead of actual tab characters), at intervals of 2 spaces.
-
Turns on line number display.
-
Disables generation of backup files that have a
~appended. I find this really annoying, and since I use version control (Git) for most things it’s unnecessary. There are plenty of cases, however, where it might be better to comment out theset nobackupline so that you’re safe instead of sorry. -
Configures the F6 key on your keyboard to toggle “paste mode”. In Vim you may find, by default, that it tries to apply some indentation ‘smarts’ to text that you type in, and when you try to paste in a block of text, things go awry. With the configuration shown above, you can press F6 while in Insert mode, and it will show that it has gone into
-- INSERT (paste) --mode. If you now paste in content while in this mode, its indentation will not be altered by Vim. Hit F6 again to exit out of paste mode.
There’s a vast amount of stuff you can configure and customise for Vim. For example, if you want, you can specify different tab formatting for different file types.
Install iTerm2

As a terminal replacement, there are many things I really like about iTerm2. Aside from being heavily customisable, it has features such as: saved profiles; session playback; split windows; and a lot of other conveniences that just make sense.
-
Go to: http://www.iterm2.com
-
Hit the ‘Download’ button (1.0.0 at the time of writing).
-
Extract the
.zipfile that you download, and you should end up withiTerm.app. -
Move
iTerm.appinto your Mac’sApplicationsfolder and, if desired, drag it to your dock. -
Launch “iTerm”.
Install Sublime Text

Sublime Text is an excellent programmer’s text editor that is modelled on TextMate but with many other enhancements. It supports a lot of TextMate’s actual config files and syntax highlighting definitions, and is available for Mac, Windows, and Linux. I strongly recommend it because it is attractive, highly customisable, and rich in sensible features.
-
Go to the Sublime Text website, download it (v2.0.2 at the time of writing), open the
.dmg, and drag theSublime Textapp into theApplicationsfolder (as is typical of most simple Mac software installs). -
Go into
Applicationsand try launching it. -
Quit out of Sublime Text.
-
Make sure you have a local
~/bindirectory, and that$HOME/binis part of yourPATH. You can ensure that this is the case, using this:cd ~ mkdir -p bin if [[ "$PATH" == *"$HOME/bin"* ]]; then echo -e "\n--- $HOME/bin is already in your path\n" else echo 'PATH=$PATH:$HOME/bin' >> .bash_profile source .bash_profile echo -e "\n+++ \$HOME/bin has been added to your path in .bash_profile\n" fiNOTE that while this will update your
PATHin the current shell, any other open shells will not yet be up-to-date unless you run:source ~/.bash_profile -
Install the
sublcommand-line utility:ln -s "/Applications/Sublime Text 2.app/Contents/SharedSupport/bin/subl" ~/bin/sublThis allows you to launch Sublime Text from command-line, to get it to open a file or folder. See the
sublcommand-line utility documentation for more info. -
Try out
subl; if we assume you have theruby-tictactoerepo as per the example given earlier in this article, you should now be able to:-
Open an individual file:
subl ~/projects/ruby-tictactoe/README.md -
Open the whole “project”:
subl ~/projects/ruby-tictactoe
-
-
Now, if you want, you can customise Sublime Text. For example, I write a lot of documents in kramdown, and there are two ‘Themes’ (i.e. colour schemes) which seem to show Markdown/kramdown highlighting the best:
- Dawn: Light background.
- Sunburst: Dark background – which I prefer because it’s easy on the eyes but also gives great highlighting in general.
To choose a colour scheme, go to the main “Sublime Text 2” menu => “Preferences” => “Color Scheme” and pick one.
NOTE: If you use kramdown files with the .kd file extension, you will either need to specify
that each file you open is in Markdown format (by clicking the bottom-right corner of
the window and choosing ‘Markdown’ => ‘Markdown’ or the same via the ‘View’ => ‘Syntax’ menu),
or configure Sublime Text to recognise .kd automatically as Markdown. Below are some links with
more information on how to customise Sublime Text, including for Markdown/kramdown:
- Extended Markdown support for Sublime Text.
- Adding Markdown/kramdown syntax highlighting to any Sublime Text theme: Make sure you read all the instructions for where to insert the given code.
- Example of extending Markdown syntax highlighting with extra kramdown features.
Other stuff worth checking out
The following is just a collection of other random pointers which you might find to be of interest in your development workflow:
-
If you’re going to be developing web apps, you will almost certainly be using Ruby on Rails (right?) but you might also want to give Sinatra a try if you’re looking to build lightweight apps and utilities that need a simple web interface.
-
For spinning up and testing web apps, especially where you want to simulate multiple domains and sub-domains, you might also want to check out Pow and Powder.
-
In terms of a good database platform both for local development, testing systems, and even enterprise production systems, I’ve grown quite fond of PostgreSQL. A project I haven’t checked out yet, but which sounds promising, is Postgres.app.
-
If you work with GitHub a bit, and in particular if you participate with a few Open Source projects, you might want to check out hub.
Troubleshooting

If you started from a clean machine and exactly followed the instructions above, I would expect that everything worked perfectly. It is possible, however, that things will go wrong (even if you did start with a clean machine), due to various factors:
-
You’re using a more recent version of OS X, for which you should be able to find solutions (e.g. see below) – resorting to Googling actual error messages if necessary.
-
You may have other stuff pre-installed which is getting in the way, particularly packages managed by something else such as MacPorts or Fink. If that’s the case, you may need to migrate from MacPorts to Homebrew, or whatever.
-
You may have chosen to customise your installation paths or other such things in a way which challenges the assumptions that these various tools make. In this case, there should be a way to diagnose these problems or get help, again by Googling or asking questions via one of the Stack Exchange sites such as Super User, Stack Overflow, or Ask Different. You can also try Homebrew’s self-diagnosis (i.e.
brew doctor), and RVM troubleshooting tips. -
Since I wrote this article, some of the tools and packages I documented may have been deprecated, either rendering them unavailable, or making the current default a newer version that has different compatibility. If that’s the case, you might have to investigate other people’s guides to fill in the blanks for getting new versions to work.
If you encounter any problems, please provide feedback by commenting below or by filling in my contact form. Feel free to ask any questions and report things you’re stuck on, though I would be hugely grateful if you identify a solution to any issues you find, and want me to include them in this article.
Tips for installing on Mac OS X 10.8 and above
While the instructions above worked fine for me on Mac OS X 10.7.5, I hit a couple of errors while installing on Mac OS X 10.8.5. This is how I worked around them:
-
While trying to install a Ruby version for the first time using RVM (i.e. with
rvm install 1.9.3), I hit an error that gave output along the lines of:Installing Ruby from source to: /Users/anton/.rvm/rubies/ruby-1.9.3-p484, this may take a while depending on your cpu(s)... ...etc... ruby-1.9.3-p484 - #applying patch /Users/anton/.rvm/patches/ruby/GH-488.patch. ruby-1.9.3-p484 - #configuring. Error running './configure --prefix=/Users/anton/.rvm/rubies/ruby-1.9.3-p484 --with-opt-dir=/usr/local/opt/libyaml:/usr/local/opt/readline:/usr/local/opt/libksba:/usr/local/opt/openssl --without-tcl --without-tk --enable-shared', showing last 15 lines of /Users/anton/.rvm/log/1390447207_ruby-1.9.3-p484/configure.log ...etc... checking target system type... i386-apple-darwin12.5.0 checking whether the C compiler works... no configure: error: in `/Users/anton/.rvm/src/ruby-1.9.3-p484': configure: error: C compiler cannot create executables See `config.log' for more details There has been an error while running configure. Halting the installation.A further inspection of
/Users/anton/.rvm/src/ruby-1.9.3-p484/config.logrevealed:... configure:3417: /bin/gcc-4.6 --version >&5 ./configure: line 3419: /bin/gcc-4.6: No such file or directory ...etc...For whatever reason, the build process assumes that
/bin/gcc-4.6exists, but in our case it is actually elsewhere (though still in thePATH):/usr/local/bin/gcc-4.6The proposed solution for this is to simply symlink
gcc-4.6where the script expects it:sudo ln -s /usr/local/bin/gcc-4.6 /bin/gcc-4.6After this, you should be able to resume installing a Ruby version with RVM.
-
X11 has been removed from Mac OS as of OS X 10.8. Since
librsvg(which we require for ImageMagick) relies on X11, you may get an error when trying to install it with Homebrew on OS X 10.8 and above. The Apple-recommended solution is to install XQuartz.Once XQuartz is installed, you may be advised that you have to log out and log back in again. After doing this, you should be able to resume installing ImageMagick with librsvg.
Installing Xcode CLT via command-line
I just provided these instructions as an example of how some of the installation steps given
above can be done remotely via SSH instead of via the Mac OS X GUI. In particular, this shows
how you can mount a .dmg file, and use installer to install from a .pkg (or .mpkg) file.
-
Download Xcode Command Line Tools however you can, and get the file up to the filesystem of the Mac onto which you will install. If we assume for now it’s in
~/Downloads, and called something likexcode462_cltools_10_76938260a.dmg… -
Go into Terminal and mount the DMG:
cd ~/Downloads hdiutil attach xcode*cltools*.dmg -
Install the extracted
.mpkg:cd /Volumes/*"Command Line Tools"* time sudo installer -verbose -pkg *.pkg -target / -
Test:
gcc --version -
Unmount the DMG:
hdiutil detach /Volumes/*"Command Line Tools"*
Conclusion
You should now have quite a capable Ruby development environment, that is easy to manage and reconfigure. While not a complete development environment for other platforms, this combination of tools should make for a stable and sensible foundation to install other software to suit your programming and testing needs, including:
- Other Ruby favourites, e.g. rspec, Cucumber, and Capistrano (or maybe Mina or Chef?)
- Other compilers and interpreters6.
- Other shared libraries and utility packages.
- Tools such as GIMP, Jenkins, and VirtualBox (maybe with Vagrant?)
- Sublime Text plug-ins, packages, and other customisations. See also: Package Control.
- The full Xcode platform.
In coming articles, I may switch between different environments (including Mac, Windows, and Linux). There are some cases where I will build upon what I’ve written in this article, showing installation guides that assume you’ve already taken these steps or the ones in my Cygwin article, if you’re using Windows.
For now though, good luck, and happy coding!

-
For information which may help with getting a similar environment working on OS X 10.8 (Mountain Lion) or above, see: The Hitchhiker’s Guide to Riding a Mountain Lion↩
-
Another alternative to RVM is rbenv. With
ruby-buildinstalled, RVM and rbenv both offer very similar functionality, and in some respects rbenv may be the smarter, more-lightweight choice if you’re using Bundler. Here is a brief guide that shows use of rbenv on a Mac.↩ -
That is, only 32-bit capable, not x64-compatible. Most Macs since then have a 64-bit capable CPU.↩
-
Many tools will require that your OS X is up-to-date. At the time of writing, OS X Lion (10.7) is up to 10.7.5. The Apple “Command Line Tools (OS X Lion) for Xcode - April 2013”, for instance, needs 10.7.4 or above.↩
-
A shell command prefixed with a backslash will ignore any alias of that command, if there is one in effect. For more information, see this question on Stack Overflow↩
-
You may find several other compilers and interpreters are already installed and ready for use, including
perl,python,php, andgcc. Some of these, however, can be replaced with newer versions that are nicely managed by Homebrew. In any case, though, I recommend reading more about them before trying to install or replace these defaults.↩