I’ve built websites and web apps for over a decade. Finally I’ve set up my own site, to share some knowledge and fun. This is where the sharing begins, by showing you how I quickly threw this site together from scratch, using nanoc.
- Background
- What is nanoc?
- Getting started with nanoc
- Making some pages with kramdown
- Skinning with Layouts
- Enumerating items for a sitemap
- Conclusion
Background
If you just want to start building a site, and don’t care why I decided nanoc was the choice for me, you can skip to the next section: What is nanoc?
It’s important that I stay enthusiastic about maintaining this project. I have to keep things simple: Tidy foundation, gradual improvements, portability with good semantic value. Ruby immediately comes to mind, but that’s not what’s special about this site…
I’ve had philosophical chats with Tom (from XPCA.org and Ruby Red Bricks) in which we’ve concluded that stuff on the web generally falls into either the “web app” or “web site” category. A “site” is traditionally a stack of information, while an “app” is usually software doing work for you in some way. The implication here is that the “site” has static content. You can freely browse and read at your leisure, or potentially take it offline. In contrast, the “app” is code running on the server that gives you dynamic, interactive responses, and as such the software is essential to you getting anything out of it at all.
The more-sinister view is that a “web app” is a complex, elevated server-side process that is constantly putting its dirty paws all over your database, your filesystem, your precious server environment… Whether you wrote it, or someone else, how far do you trust it (or its underlying systems) to not do something stupid and devastating when a nefarious user or bot tickles it a certain way?
I’ve been bitten a few times by design or programming flaws in WordPress, for example, or by security holes in my hosting provider’s network. I got tired of having to always patch these systems, and review/repair my site after an attack. While it is true that no system is 100% secure, there are ways that website breaches can be reduced and more-easily be mitigated. One good way is by eliminating server-side code.
“No server-side code? What are you, some sort of n00b?” I hear you say, but bear with me… Publishing of content via live server-side code (i.e. a web app) is typically for one or more of these reasons:
- It simplifies the work of maintaining and delivering the content, especially by automatically building and formatting all pages;
- It delivers extra interactive features such as comments and searches.
- Potentially anyone, anywhere, anytime can log in and edit the site with their browser.
- Meta! Plugins! Stats! Tag clouds! And all that other stuff.
There are actually ways of dealing with these requirements without using server-side code, and this is where nanoc comes in…
What is nanoc?
The principle of nanoc is to apply a the development and release cycle to your content. That is, maintenance of your site is done offline, as a programmatic representation of your raw content, while delivery is achieved by compiling to static HTML and uploading to your web host. That’s not to say that nanoc is limited to static HTML, either, but for now let’s just focus on the requirements of a very simple blog site:
- Consistent look-and-feel including header, footer, and menu: nanoc refers to this as “layouts”, modeled on the Ruby on Rails concept.
- Easy formatting of content: nanoc lets you specify “filters” which process your raw content in (say) any one of several mark-up languages, to produce formatted output. For example, kramdown support is built into nanoc.
- Generated menus and index pages: At compile-time, nanoc can enumerate your content, optionally by hierarchy. It is also possible to generate different representations (or “reps”) of your content. This helps with (say) collating post summaries on a single index page.
- Search: Google Site Search does just fine.
- Versioning and multiple authors: Why not keep your nanoc site’s source files in an SCM system such as GitHub?
- Comments and other buzz: There are 3rd-party services such as IntenseDebate or DISQUS which can be added to provide comments, amongst other real-time integration options.
- Tags and other Meta: Use built-in Helpers, or write your own, to add extra stuff to your pages and automatically cross-reference/index them at compile-time.
nanoc provides many other advantages and features, but the requirements above are easy enough to get started with, and are probably the most essential for a minimalist blog site.
Getting started with nanoc
These instructions are specific to Windows, but the install process under Linux or Mac OS X is quite similar. In some ways I’d recommend a Unix-based platform. Anyway, all commands are meant to be run from command-line, at any path, unless otherwise specified.
Install or update Ruby
Note that some Ruby and Rails apps may rely on certain older versions of Ruby and Rubygems: If you’re on an existing Ruby-based production environment, exercise caution and consider skipping to the Install nanoc and friends section.
Check if you already have Ruby, by running:
> ruby -v
ruby 1.8.7 (2011-02-18 patchlevel 334) [i386-mingw32]
If the command won’t run, or if your Ruby version is not 1.8.6 or above, then:
- Download and install Ruby (say, v1.8.7).
- When running the Windows installer, specify to “Add Ruby executables to your PATH”.
- Open a new command prompt (so as to load the new
PATH) and verify your installation using theruby -vcheck.
Now, check your Rubygems version with:
> gem -v
1.5.2
If you can’t run gem, you may need to install it.
If your version is below 1.3.5, you should consider updating with:
> gem update --system
Updating rubygems-update
Fetching: rubygems-update-1.7.1.gem (100%)
...
RubyGems system software updated
Install nanoc and friends
To install nanoc, kramdown, and adsf:
> gem install nanoc kramdown adsf
Check the installed version of nanoc:
> nanoc --version
nanoc 3.1.6 (c) 2007-2010 Denis Defreyne.
Running ruby 1.8.7 (2011-02-18) on i386-mingw32 with RubyGems 1.7.1
For Windows, install the win32console gem to support colours in the console:
> gem install win32console
Create a site project
To create a new site project in a subdirectory called myblog, issue the
command: nanoc create_site myblog:
> nanoc create_site myblog
        create  config.yaml
        create  Rakefile
        create  Rules
        create  content/index.html
        create  content/stylesheet.css
        create  layouts/default.html
Created a blank nanoc site at 'myblog'. Enjoy!
Compile and view the site
Go into myblog and compile with nanoc compile:
> cd myblog
> nanoc compile
Loading site data...
Compiling site...
          create  [0.00s]  output/style.css
          create  [0.03s]  output/index.html
Site compiled in 0.16s.
Start up a basic web server to host the site locally, with nanoc view:
> nanoc view
[2011-04-02 22:39:27] INFO  WEBrick 1.3.1
[2011-04-02 22:39:27] INFO  ruby 1.8.7 (2011-02-18) [i386-mingw32]
[2011-04-02 22:39:27] INFO  WEBrick::HTTPServer#start: pid=3596 port=3000
Check it out at: http://localhost:3000/
Kill off the web server with CTRL+C. If asked, answer “Y” to Terminate batch job (Y/N)?.
Making some pages with kramdown
kramdown is an elegant mark-up language based on Markdown. It looks much like a plaintext document, and as such is easy to read in its raw form. As a mark-up language it has great semantic value, is feature-rich, and compiles well into HTML.
Enable kramdown by editing the Rules file and changing the compile '*' block to:
compile '*' do
  filter :erb
  filter :kramdown
  layout 'default'
end
This block tells the nanoc compiler that default behaviour for compiling every
content file (i.e. *) is to first process any ERB code, then process the result
as kramdown text, in order to generate nice HTML output. Finally, the default
layout is applied as a skin.
Edit content\index.html and replace it with this example kramdown code:
---
title: Hello, World!
---
Welcome to my nanoc page
===

* Table of contents will replace this text.
{:toc}

Introduction
---
This is an example site that I have created using [nanoc](http://nanoc.stoneship.org/)
and kramdown. I like nanoc because it is:

* Like programming, but for **beautiful** content
* Easy to use, but very flexible *and* extensible
* [Ruby]-like

*[programming]: The art of making computer software
[Ruby]: http://ruby-lang.org/ "The Ruby programming language"

Conclusion
---
I feel in control! That is all, for now.
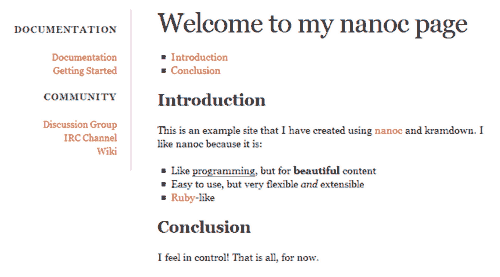
Compile the site again with nanoc co (short for compile) then serve it
with nanoc v (short for view), and check out the result, which should be
something like this:
Great, now we have a basic homepage. Next we’ll create a couple of pages
which we’ll call “posts”, that will later be treated like official blog
posts. Use the nanoc ci (i.e. create_item) command for this:
> nanoc ci posts/first-post
      create  content/posts/first-post.html
An item has been created at /posts/first-post/.
This will have created the content/posts subdirectory, and created a file
in there called first-post.html. An interesting thing you’ll notice about
“items” in nanoc is that they all have “identifiers” which follow a strictly
path-like pattern. In this case, the source file may be
content/posts/first-post.html but it maps to an identifier of
/posts/first-post/.
Furthermore, the behaviours specified in our Rules
file will, by default, write the final output file in such a way that would
allow this identifier to resolve as a real URL on any typical webserver.
Namely, the compiled output will be output/posts/first-post/index.html.
Verify this by re-compiling the site:
> nanoc co
Loading site data...
Compiling site...
      create  [0.17s]  output/posts/first-post/index.html
   identical  [0.00s]  output/style.css
      update  [0.02s]  output/index.html

Site compiled in 0.25s.
…then hosting it with nanoc v, and checking out the following URL:
- http://localhost:3000/posts/first-post/
At first this behaviour seemed a little peculiar to me, especially since it
seemed like it would be impossible to have actual final HTML output files
named anything but index.html. However, the identifier patterns help simplify
how to “route” your output files depending on your specific needs, and there
are many cases where you will override this default behaviour. Don’t worry about
this for now, though, and instead just stop your web server (CTRL+C) and
create a second post:
> nanoc ci posts/another-post
You now have two dummy pages (i.e. “items”) in a content/posts subdirectory.
Edit them to be something like the following, just so you can tell them apart:
-
content/posts/first-post.html:--- title: First Blog Post --- Hi there, this is my first blog post. -
content/posts/another-post.html:--- title: Another Blog Post --- Hello again. This is my **second** blog post.
At the start of any textual item, any line(s) between the first and second sets
of hyphens (---) define YAML-formatted metadata for the file. All items in
nanoc support metadata, defined in one way or another. For textual items, this
inline format is used. For other items (e.g. pictures), a parallel .yml file
can be included. In the examples
above, the inline metadata simply specifies the title for each post. If you compile
and view the site, you’ll notice that these titles are used in the HTML <TITLE> of
each page.
Skinning with Layouts
Layouts in nanoc are templates that can be applied to textual content, typically
to wrap a shared structure around the content. Consider a textual item which
is compiled into a HTML page: The item will just contain the guts (or body text)
of the page, while the layout will contain the wrapping <HTML>, <BODY>, and
other such tags, and hence will define the look-and-feel of all pages.
Our existing Rules file specifies that the default layout should be used for
all pages, and it does this with the layout 'default' statement in the compile
block. This actually refers to the file layouts\default.html. Later on in
the Rules file, we also see a statement that specifies that the layout file
itself should be run through the ERB filter:
layout '*', :erb
# Asterisk (*) specifies that all layouts will use the :erb filter.
So let’s replace layouts\default.html with the following:
<!DOCTYPE HTML>
<html lang="en">
  <head>
    <meta charset="utf-8">
    <title><%= @config[:site_title] %> - <%= @item[:title] %></title>
    <link rel="stylesheet" type="text/css" href="/style.css" media="screen">
    <meta name="generator" content="nanoc 3.1.6">
  </head>
  <body>
    <div id="main">
      <h4><%= @config[:site_title] %> proudly presents:</h4>
      <%# Content gets inserted here: %>
      <%= yield %>
    </div>
    <div id="sidebar">
      <h2>Index</h2>
      <ul>
        <li><a href="/">Home</a></li>
      </ul>
    </div>
  </body>
</html>
Ruby on Rails developers will be familiar with this. Let’s go through some key features:
- Though simple, this represents a complete HTML page.
- It lacks the body content, but requests insertion of the body content
with the
<%= yield %>ERB statement. - A few other simple ERB tags have been used to insert the title of the
site in a couple of places, as well as insert the title of the page
(remember that metadata?) as part of the HTML
<TITLE>.
Note that the @config[:site_title] bit refers to a global parameter that
I just made up, and which hasn’t yet been defined. To define it, add this
line to the end of the config.yml file:
site_title: My Rants and Raves
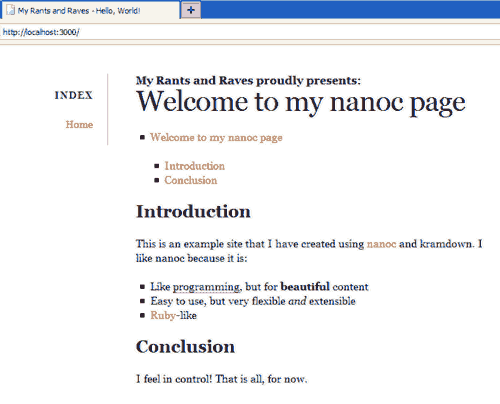
Now let’s compile and see what this has done to the look of our site:
Enumerating items for a sitemap
In nanoc, there are several methods and variations for automatically generating
index pages and sitemaps. I will touch on these in a later article, but most
or all methods will rely on enumerating the nanoc site’s “items”. To generate
a very basic, unfiltered list of items on your site’s homepage, try replacing
the “Conclusion” section of content/index.html with the following:
Sitemap
---
This is a list of all items within this site:

<% @items.each do |i| %>
* [<%= i.identifier %>](<%= i.path %>) - <%= i[:title] %>
<% end %>
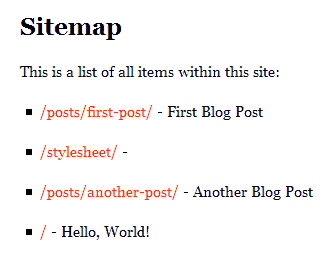
Compile this, and view it at http://localhost:3000/, and the “Sitemap” section will reveal something like the following:
 Basic sitemap - an unfiltered nanoc item list
 So what’s going on here? The code between the <% and %> markers is ERB.
This is being executed before anything else, by virtue of the filter :erb
statement coming before any others in the compile '*' do rule, in the
Rules file. That code is enumerating all items in nanoc’s @items array,
and for each it is plucking out certain key attributes of the item and
formatting it in kramdown syntax using the following pattern (to use stylesheet
as the example, since it is unique):
* [/stylesheet/](/style.css) - Title would go here
Note that I’ve demonstrated the title attribute here, though it is actually absent from our “stylesheet” item.
This in turn is interpreted by kramdown into:
<li><p><a href="/style.css">/stylesheet/</a> - Title would go here</p></li>
So this demonstrates the following attributes of an item:
-
item.identifier- The item’s unique identifier string -
item.path- The path to which the compiled output was written, which can be used as an URL. -
item[:title]- Thetitle:attribute (if any) taken from the item’s metadata.
Now let’s extend this a little bit further to present a list of stuff from /posts/...
only, including date/time:
Sitemap
---
This is a list of blog posts:

<% posts = @items.select { |x| x.identifier.match(%r{^/posts/}) } %>
<% posts.each do |i| %>
* <%= i.mtime.strftime('%Y-%m-%d, %H:%I:%S') %> - [<%= i[:title] %>](<%= i.path %>)
<% end %>
Without going into the details of the Ruby language, this will first
select the items that we want to list (i.e. any whose identifier begins
with /posts/). It will then use the mtime property of each item
(i.e. time of last modification) to build up a year-month-day hour:minute:second
string, followed by the title of the post as a link to the post itself.
Conclusion
One thing I love about nanoc is that I’m always discovering new and elegant solutions that it has for various common tasks, and I’ll introduce some of these (including more of the actual “blogging” side of things) in the next part of this series. Many of nanoc’s built-in features are very easy to extend, and the overall design appeals to me as a programmer. It’s a bit addictive once you start learning how nanoc ticks.
nanoc is definitely not for someone who wants an out-of-the-box solution and I wouldn’t recommend using it to build a site for a client. There are numerous excellent free plug-ins and skins available for things like Joomla! and WordPress if you just have a job to do.
If, however:
- You’re a programmer
- You’re building your own site
- You like the idea of having total control
- You enjoy learning new things
…then I think you will get a lot of on-going satisfaction out of working with nanoc.


