This is the first article in a short series on throwing yourself quickly into learning game development for the Nintendo Entertainment System. The idea will be to get quick results by example, while learning some key details of how the platform and development tools work.
- Introduction
- NES Development Environment
- Testing your emulator
- Testing cc65 by building example code
- Conclusion
- Appendices
Introduction

I love the aesthetic of classic videogames, and the technical oddities of their platforms. I got into game development for the NES (Nintendo Entertainment System) to understand and enjoy these aspects more, but also for the challenge and skills to hopefully ready me for some related future projects.
After reading a lot of articles I really just wanted small examples that did something useful, while explaining them well. While there are many tutorials on game development for the Nintendo Entertainment System, my objectives in this short series will be to help you quickly get an environment going, build some very basic examples, try them out, and then expose exactly what’s going on.
In this first article, I cover the bare essentials for Windows, Mac OS X, and Linux. That is, a means to compile code that targets the NES, and a way to see that code running on your PC. At the end of this article, you will compile and run some example code to prove that your environment works. This will set the stage for fun stuff starting in the next article, when it is ready.
NES Development Environment
Of all the PC-based tools you may use when developing for the Nintendo Entertainment System, these are the essentials:
-
A compiler/assembler. I strongly recommend the cc65 cross-compiler/assembler for the 6502 CPU. It is very well-written, highly configurable, and available for Windows, Linux, and Mac OS X. Future articles will focus on how to use it effectively.
-
A NES emulator1. With an emulator, any NES-format files you create can be run directly on your PC – much as they would run on a real NES – for quick testing. Some emulators are better than others at precisely emulating all known features (and quirks) of the real NES hardware. A handful of emulators offer inspection and debugging features, too.
Choosing an emulator depends on your platform, but for now I recommend FCEUX as it is available for Windows, Linux, and Mac OS X. Note that while it has excellent debugging features in the Windows version, disappointingly these are absent from the Mac and Linux versions at this time. See the alternative software appendix below for other compilers and emulators, but note that this article focuses on cc65 and FCEUX.
In the instructions below, I show you how to install both cc65 and FCEUX, under Windows, OS X, and Linux.
Installing on Windows
-
First, we install FCEUX:
Go to the FCEUX download page, download the “FCEUX win32 Binary” (I used the latest available at the time, 2.2.2), and extract it. It has no installer, so just place the extracted files wherever you like, and run
fceux.exeto test that it launches. -
Make sure the location where you placed
fceux.exeis added to your systemPATH, because you will usually want to launch compiled files with FCEUX, directly from your command-line. -
Then, we install cc65:
Download the cc65 installer. You’re looking for
cc65-2.13.3-1.exeor similar. I went to the original cc65 FTP site and downloadedcc65-2.13.3-1.exebut that may be closed down at some point. If so, mirrors are available. -
Launch the
cc65-2.13.3-1.exeinstaller, and perform a default install. -
Verify that it has installed by bringing up a new Command Prompt and running:
> cc65 --version
cc65 V2.13.3
SVN version: 5495
Now you can proceed to the ‘Testing your emulator’ section.
Installing on Mac OS X
These steps rely on Homebrew to install both cc65 and FCEUX. You can alternatively compile the latest source for cc65 and FCEUX, but that’s the hard way to go about it.
-
Make sure Homebrew is up-to-date, and that its environment is set up correctly:
brew update brew doctor -
Install the
cc65package:brew install cc65 -
Test:
$ cc65 --version cc65 V2.13.3 SVN version: unknown -
Next we’ll install FCEUX, but please note that FCEUX requires an X11 environment. If you have OS X 10.7 or below, then you already have
X11.appbuilt in, and there’s nothing you need to do. If you have OS X 10.8 (Mountain Lion) or above, Apple recommends installing XQuartz. -
Now install the
fceuxpackage, which for me took about 40 minutes due to all the extra packages required to build it on OS X:brew update brew install homebrew/games/fceuxNOTE: Previously, FCEUX could be installed with just
brew install fceux, but the package has been removed from the standard Homebrew set.
Now you can proceed to the ‘Testing your emulator’ section.
Installing on Linux
So far I have only attempted to install cc65 and FCEUX on Ubuntu 12.04 LTS (64-bit), where I
rely on APT (i.e. apt-get, as used by Ubuntu and Debian). I also have an appendix for
instructions to compile cc65 and FCEUX on Linux.
If you have reliable and complete instructions for other platforms, please let me know.
-
First we install cc65:
Spiro Trikaliotis has prepared, and hosts, an APT repository that can be used to install cc65 as a Debian package. To use it, first make sure you have
debian-keyringinstalled.sudo apt-get install debian-keyring -
Add the key for Spiro’s repository:
# NOTE: Sometimes this server can take over 90 seconds to respond: gpg --keyserver wwwkeys.pgp.net --recv-key 2AF47E44 gpg -a --export 2AF47E44 | sudo apt-key add - -
Add Spiro’s repository to your APT sources, by editing
/etc/apt/sources.listand adding the following lines at the end:deb http://debian.trikaliotis.net/ stable contrib deb-src http://debian.trikaliotis.net/ stable contrib -
Update your APT sources:
sudo apt-get update -
Install specifically2 version
2.13.3-1ofcc65andcc65-nes:sudo apt-get install cc65=2.13.3-1 cc65-nes=2.13.3-1 -
Check
cc65:$ cc65 --version cc65 V2.13.3 SVN version: 5401 -
Now we install FCEUX:
First, make sure
curlandunzipare installed, as they will come in handy later:sudo apt-get install curl unzip -
Install the
fceuxpackage:sudo apt-get install fceux…which, at the time of writing, installs specifically version
2.1.5+repack-0buntu1on Ubuntu 12.04.
Now you can carry on into the ‘Testing your emulator’ section below.
Testing your emulator
-
Download a NES ROM package file (i.e. a
.nesfile) from somewhere, and launch it withfceux. For example, grab the free BombSweeper, extract the file, and launch it.On Windows, just download the file and extract it. Then go into Command Prompt, and into the directory where you extracted it, and you should be able to launch it with:
fceux BombSweeper.nesOn Mac OS X and Linux, you should just be able to do:
curl -Lo bombsweeper.zip http://www.zophar.net/download_file/11839 unzip bombsweeper.zip fceux BombSweeper.nes -
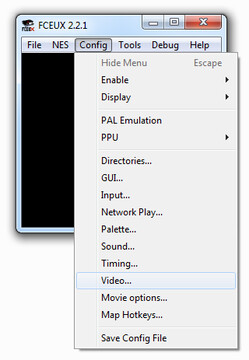
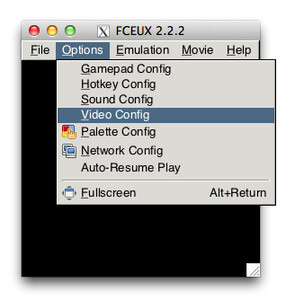
You will probably want to scale the display, so go to FCEUX’s video configuration and set both the X and Y scaling factors to
2.0(or maybe even3.0).On Windows, go to the ‘Config’ menu, select ‘Video…’ and change the ‘Size Multiplier’ fields:

On Mac and Linux, you need to go to the ‘Options’ menu and select ‘Video Config’:

Testing cc65 by building example code
Though I won’t get into explaining NES coding concepts until the next article in this series, we should at least grab some example code now and make sure it compiles and runs.
I have set up a public GitHub repository
(algofoogle/nes-gamedev-examples)
which will be fleshed out with example source code corresponding to each article
in this series.
-
Grab my
nes-gamedev-examplesrepo:git clone https://github.com/algofoogle/nes-gamedev-examples.gitAlternatively, you can direct-download the
masterbranch as a ZIP file, and extract it. -
In your shell/command-prompt, go into the
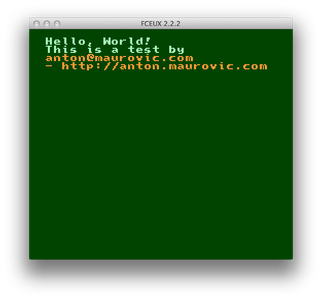
part01/ex01-c-exampledirectory, which is source code in C that displays a simple message and plays a tone. -
Build it with cc65 (specifically the
cl65“compile-and-link” tool) as follows:cl65 -t nes hello-nes.c -o hello.nes -
Try launching the resulting
hello.nesfile with FCEUX:fceux hello.nes
NOTE that I’ve sometimes seen on Mac OS X that FCEUX will take a long time to properly launch if X11 is not already running. If you’re on OS X 10.7 or below, you can launch X11 in advance with:
open /Applications/X11.app…and there would be an equivalent for OS X 10.8 and above with XQuartz.
NOW we will try assembling an example written in 6502 assembly language:
-
Go into the the
part01/ex02-asm-exampledirectory of the repo. -
Assemble the
test.sfile, with:ca65 test.s…which produces the
test.oobject file. -
“Link” the object file into a
.nesbinary file, with:ld65 test.o -o test.nes -C nesfile.ini -
Try launching the resulting
test.nesfile with FCEUX:fceux test.nes
Conclusion
So, where to from here? You now have a way to take raw source code and build a .nes
file from it, that can then be played on your PC in a Nintendo Entertainment System emulator.
You can have a go at figuring out what’s going on in the example source code if you like, but some of it is quite complex and counter-intuitive, so don’t feel bad if it just gives you a headache.
In my next article I intend to explain what a .nes file actually is and how cc65’s
build process (and configuration) works. Then I’ll start explaining the core code found
in every game for the Nintendo Entertainment System.
I’ll begin with much simpler examples (that also uncover
key 6502 assembly concepts), and work up through essential features of a minimal
functioning NES program.
If you’re keen to get on with it, though, you might want to read the following:
- Alternative Software for NES Development
- Nerdy Nights NES programming tutorials
- Programming NES games in C
Good luck, and see you next time!

Appendices
Each appendix here is provided in case you are having trouble with installing cc65 or FCEUX, or for those who want to try out alternatives to the process I’ve recommended above. You don’t need to read any of this if you have successfully completed the above build-and-run test.
Mirrors of cc65
At the time of writing, the latest version of cc65 is maintained by Oliver Schmidt, at the new cc65 website. The latest source code is available via Oliver’s cc65 GitHub repo, and is still actively maintained.
In principle, you can find everything you need via: the new cc65 website; the new cc65 Wiki pages; and the cc65 GitHub repo. This includes instructions for building on Windows, where you may prefer (or need) to take the 2nd option (“Use prebuilt cc65 binaries”) rather than compiling those binaries yourself – so long as you first install “Make for Windows” as described on that page.
I, however, was lazy and opted to just download the cc65-2.13.3-1.exe installer
for Windows. This can can be obtained (with the source code, amongst other
things) from any of the following mirrors:
I also have my own copy of all the files; if you’re really stuck, contact me.
Building cc65 and FCEUX from source on Mac OS X
Be warned: Compiling cc65 is easy enough, but compiling FCEUX on OS X may be painful. Installing with Homebrew is strongly preferred. Otherwise, proceed with caution.
Building cc65 on Mac OS X
-
Make sure you have
gitinstalled. If not, see: Set Up Git. -
I assume you will keep all your projects in a folder called
projectsin your home directory. So, following this, go into Terminal and:mkdir -p ~/projects cd ~/projects -
Use
gitto clone thehttps://github.com/oliverschmidt/cc65.gitrepository:git clone https://github.com/oliverschmidt/cc65.git cd cc65 -
You now have the source code for cc65. Simply build it with:
makeIf it fails straight away on this
makecommand, you probably need to install the Xcode Command Line Tools.If you do have a working
make, it will spew a lot of information as it compiles all the source files and builds the final binaries. In my case it also gave a warning at the end:ar65: Warning: Library `../lib/supervision.lib' not found - will be created…but this can be ignored.
-
Do a test run:
$ bin/cc65 --version cc65 V2.14.0 cc65: No input files -
Now install it system-wide:
sudo make installOR if that doesn’t work, try this instead:
sudo make avail…and the binaries (
cc65,ca65, etc) should now be found in (say)/usr/local/bin. -
Test again:
$ cc65 --version cc65 V2.14.0 cc65: No input files -
You should also ensure you have the
CC65_HOMEenvironment variable set to the path which contains your cc65 binaries. You can add this, for example, to your~/.profile(or, if you already have a~/.bash_profilefile, add it to that instead;~/.bash_profileoverrides~/.profile):echo "export CC65_HOME=$(dirname `which cc65`)" >> ~/.profile source ~/.profile
Building FCEUX on Mac OS X
If you have OS X 10.8 or above, you will need an X11 environment to build and run FCEUX. Apple recommends installing XQuartz in this case.
Apparently, building FCEUX on Mac OS X is not exactly easy. There are a lot of depenencies required, and many people end up managing these dependencies with Homebrew, MacPorts, or Fink anyway.
I’ve found that ConsoleEmu.com – despite occasional page load errors3 – has builds of FCEUX for Mac OS X (with more recent ones at the bottom). Note that I can’t vouch for how good these are, as I haven’t tried them out. If you do have success with them, please let me know, including anything that you had to do besides just extracting and launching.
Anyway, if you are determined to build FCEUX on Mac OS X, you may find the following links helpful:
- Official FCEUX build instructions for OS X;
- Some tips on building FCEUX on Mountain Lion;
- FCEUX Homebrew formula code and original announcement, which may give you some tips on how a working build process can be achieved.
Building cc65 and FCEUX from source on Linux
I only tested this lightly, from a fresh install of Ubuntu 12.04 LTS (Precise Pangolin) 64-bit. I did the following:
-
Update APT sources:
sudo apt-get update -
Install
gitandmake:sudo apt-get install git make -
Grab the cc65 repository:
mkdir -p ~/projects cd ~/projects git clone https://github.com/oliverschmidt/cc65.git -
Build cc65:
cd ~/projects/cc65 make -
Install cc65:
sudo make avail -
Test:
$ cc65 --version cc65 V2.14.0 -
Now, when it came to building FCEUX on Linux, I didn’t bother trying. Hopefully you will find adequate instructions via one of the following:
Alternative Software for NES Development
I won’t keep these tables up-to-date. Hence, the “Version” and “Last updated” columns may fall behind the actual latest versions.
Below, I have listed some alternative software you can use for assembling NES-targeted
6502 assembly code, as well as alternative emulators for running .nes files. I certainly
haven’t done any sort of review of the information below; I have tried to dig around and
find out a little bit about each package, but I haven’t really tried any of them out.
NOTE: I’d like to give special mention to NESICIDE, which is a new NES IDE (Integrated Development Environment). It has been in development for some time and hopes to combine several NES development tools into one package. The plan is that it will comprise a source editor, emulator, compiler/assembler, debugger, and graphics/sound editor. It looks promising, but development on it seems to have slowed, and most features are so far only available for Windows; not so much for Mac OS X and Linux. Keep an eye on it, though, and maybe you feel like contributing to the project, or making a donation?
Alternative 6502 assemblers
| Product | Version | Last updated | Win? | Mac? | Linux? | Source? | Notes |
|---|---|---|---|---|---|---|---|
| cc65 | 2.14.0 | 2013-10-18 | YES | YES | YES | YES | Includes C compiler, and config targeting many 6502 systems. |
| ASM6 | 1.6 | 2010-11-03 | YES | No | No | YES4 | Releases of ASM6 are ad-hoc, not “managed”. |
| NESASM3 | 3.1 | 2011-01-08 | YES | No | Yes?5 | YES | Simplistic, NES-specific. Focus of “Nerdy Nights” tutorials. |
| DASM | 2.20.11 | 2008-09-22 | YES | Yes? | Yes? | YES | Targets multiple platforms and other 8-bit CPUs. |
Alternative NES emulators
| Product | Version | Last updated | Win? | Mac? | Linux? | Source? | Notes |
|---|---|---|---|---|---|---|---|
| FCEUX | 2.2.2 | 2013-09-23 | YES | YES | YES | YES | Debugging excellent in Win, but absent from Mac/Linux. |
| Macifom | 0.16 | 2011-09-27 | No | YES | No | YES | Native Mac app with .dmg available. Basic debugger. |
| Nintendulator | 0.970 | 2013-04-236 | YES | No | No | YES | Good debugging tools. Trying for high-accuracy. |
| Nestopia | 1.45 | (Various) | YES | YES | YES | YES | See below for more info. |
Nestopia versions
Nestopia was originally (?) a Windows-only NES emulator, but there have been different forks of it to support Linux and Mac OS X also.
-
The original Windows version of Nestopia is 1.40, and since 2008 has been abandoned. It can be found on the Nestopia downloads page along with source code.
-
A Mac OS X version (1.4.1), from September 2008, is available via Richard Bannister’s website.
-
It seems rdanbrook (aka 0ldsk00lca) has taken over creating more-recent versions of Nestopia, which is up to version 1.45:
- A Windows binary is available.
- Source code is available via GitHub.
- There are packages available for installing on Debian, Arch Linux, and OpenBSD.
-
While this article focuses on PC-based emulation for testing, in a future article I will demonstrate making a basic reprogrammable cartridge (“GamePak”) that can be used in a real NES.↩
-
I found that if I did a default install with
sudo apt-get install cc65, it would install a more-recent (unstable?) version:2.13.9-svn5990-1. This seems to have a problem where it reports the following errors when I try to target the NES using C source:$ cl65 -t nes hello-nes.c -o hello.nes Unresolved external `doneirq' referenced in: callirq.s(41) Unresolved external `initirq' referenced in: callirq.s(40) ld65: Error: 2 unresolved external(s) found - cannot create output file -
At the time of writing, links within ConsoleEmu.com are coming up partly blank, or reporting 404 errors. I’ve noticed that it sometimes appends a PHP Session ID (e.g.
?PHPSESSID=44baf3d2xxx8b610e3b) on some URLs, and these seem to screw up its internal link parsing. In those cases, I just remove this suffix (including the question mark), and it seems to work.↩ -
Source code for ASM6 is supplied as a single C file, along with the ASM6 binary, in the downloadable ASM6 archive.↩
-
This article on NintendoAge suggests, in the “ASSEMBLERS” grid, that NESASM3 is available for Linux. It’s not clear whether you just have to compile it for Linux yourself from the source which appears to be managed as a Dev-C++ project.↩
-
The “current release” (0.970) is from 2010-01-02. The Downloads page for Nintendulator has a sub-heading describing the “Latest unstable build” which, at the time of writing, is 0.975 Beta, last updated on 2013-04-23. Latest source is also available, as well as source code for the mapper DLLs.↩
